
Picture this: You’re eager to experiment with the cutting-edge Qwen 3.5 model on your local Ollama server, only to be met with a frustrating error – it requires a newer version of Ollama. This scenario is all too common in the rapidly evolving world of local large language models (LLMs). Outdated software can bottleneck your access to the latest features, performance improvements, and, critically, new model compatibility.
This comprehensive guide will walk you through the essential steps to update your Ollama server, ensuring you can download and run the latest AI models without a hitch. We’ll cover everything from system preparation to verifying your update, providing a smooth and efficient upgrade path.
🎥 Video Overview
Understanding Ollama and the Criticality of Updates
Ollama has rapidly emerged as a powerful, user-friendly tool for running large language models locally. It simplifies the process of getting LLMs like Llama 2, Mistral, and many others operational on your own hardware. This local execution offers unparalleled privacy, control, and often, cost-effectiveness compared to cloud-based alternatives.
However, the field of AI is characterized by its breakneck pace of development. New models, optimized architectures, and performance enhancements are released almost daily. For Ollama to remain compatible with these advancements, frequent updates are absolutely essential.
Keeping Ollama updated ensures you have access to:
- New Model Compatibility: Run the latest LLMs as soon as they are released.
- Performance Improvements: Benefit from optimizations that make models run faster or more efficiently.
- Security Patches: Address potential vulnerabilities.
- New Features: Access new commands, integrations, or functionalities within Ollama itself.
Pre-Update Preparations: System Refresh and Reboot
Before initiating the Ollama update, it’s crucial to prepare your underlying operating system. This ensures that all existing packages are up-to-date. This step significantly reduces the chances of conflicts or unexpected behavior during the Ollama update process.
For Debian/Ubuntu-based systems (common in many self-hosted environments and virtual machines like those running on Proxmox), this involves two primary commands: `apt update` and `apt upgrade`.
1. Updating Package Lists: The `sudo apt update` command fetches the latest package information from the configured repositories. This doesn’t install new software but rather updates the local list of available packages and their versions. It’s like refreshing your catalog of available software.
2. Upgrading Installed Packages: Following this, `sudo apt upgrade -y` (the `-y` flag automates the “yes” confirmation) downloads and installs the newer versions of all packages currently installed.
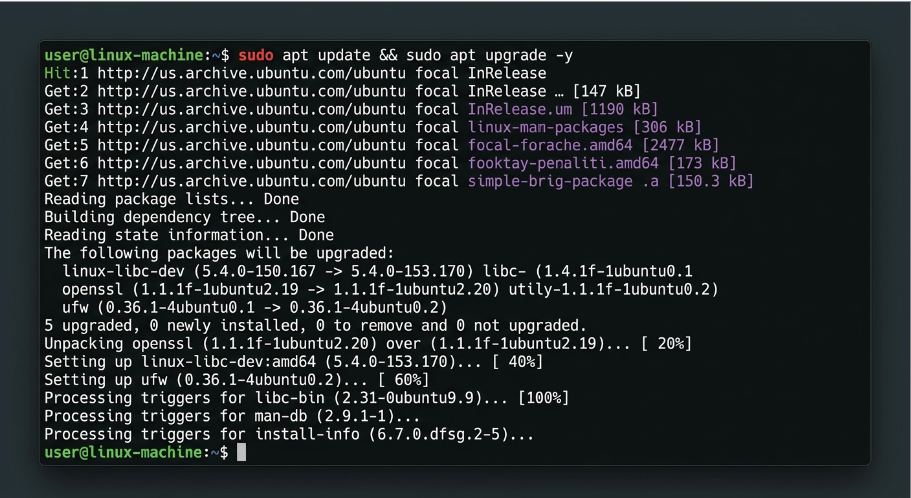
Execute these commands in your terminal:
sudo apt update && sudo apt upgrade -yOnce the package updates are complete, a system reboot is highly recommended. A reboot ensures that all updated kernel modules, libraries, and services are correctly loaded and initialized. While not always strictly necessary, it’s a best practice that guarantees a clean slate for the Ollama installation. If you are running Ollama on a virtual machine (VM), this reboot will restart the entire virtual instance. To reboot your system:
sudo rebootAllow your system to restart completely before proceeding with the Ollama update. This ensures a stable and refreshed environment.
Executing the Ollama Update Command
With your system fully updated and rebooted, you are now ready to update Ollama. The Ollama project provides a convenient shell script that handles the download, installation, and configuration of the latest version. This script intelligently detects your system architecture and sets up the necessary services.
The primary command for installing or updating Ollama is a `curl` command piped directly to `sh`.
Let’s break down what this command (curl -fsSL https://ollama.com/install.sh | sh) does:
- `curl`: This is a command-line tool for transferring data with URLs. In this case, it’s used to download the installation script.
- `-fsSL`: These are flags for `curl`
- `-f` or `–fail`: Fail silently (no output at all) on server errors.
- `-s` or `–silent`: Don’t show progress meter or error messages.
- `-S` or `–show-error`: Show error when -s is used.
- `-L` or `–location`: Follow redirects.
- `https://ollama.com/install.sh`: This is the URL of the official Ollama installation script.
- `| sh`: This is a pipe. It takes the output of the `curl` command (the installation script content) and passes it directly as input to the `sh` (shell) command, which then executes the script.
This command will download the latest Ollama installer, remove any existing Ollama installation, and install the new version. It will detect your hardware, specifically if you have an Nvidia GPU, and configure Ollama to utilize it.
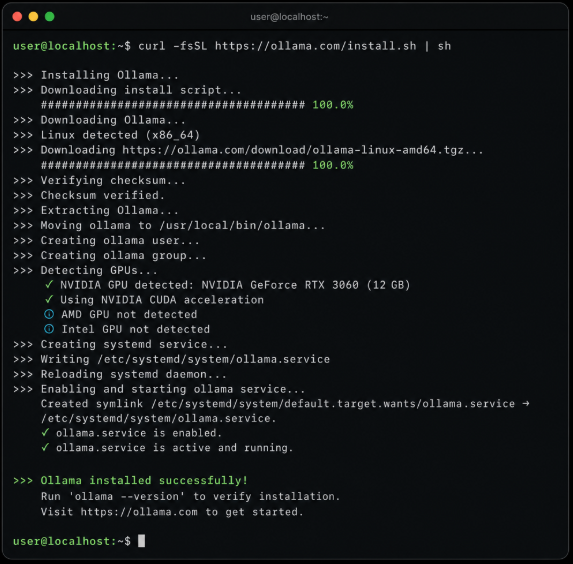
Execute the following command in your terminal:
curl -fsSL https://ollama.com/install.sh | sh
You will be prompted to enter your password if you are running this with `sudo` (though the script itself typically handles privilege escalation if needed). The output will show the download progress and installation steps, including the creation of the Ollama service and confirmation of GPU detection. This step is usually quick, depending on your internet connection and system speed.
Verifying the Update and Testing New Models
After the installation script completes, Ollama should be updated and its service restarted. The most straightforward way to verify the update is to attempt to download and run a new model that previously caused the version incompatibility error. In our scenario, this is the Qwen 3.5 model.
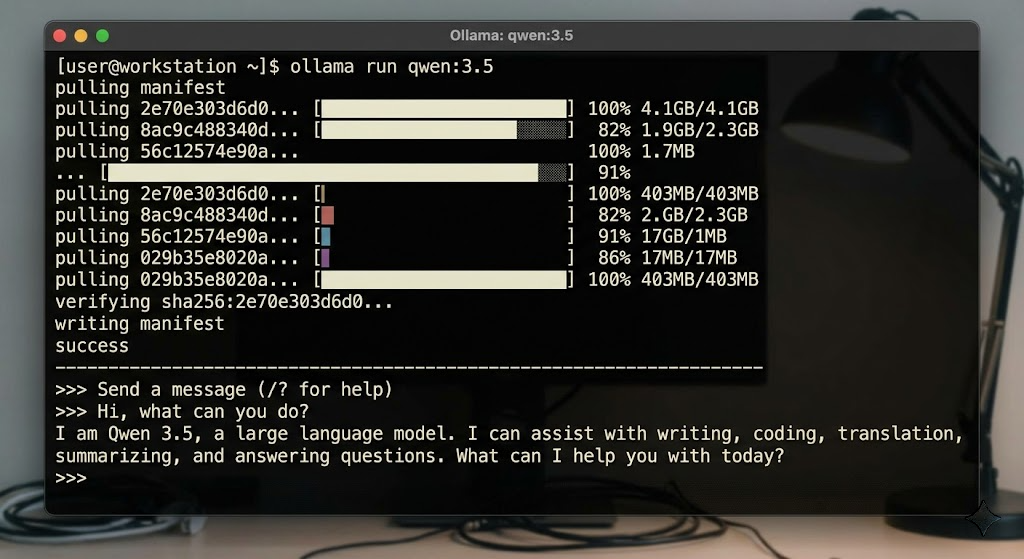
To pull and run the Qwen 3.5 model, use the `ollama run` command:
ollama run qwen3.5:latestThe first time you run a model that isn’t already downloaded, Ollama will automatically begin pulling the model’s manifest and then its layers. Be prepared for a significant download size; models like Qwen 3.5 can be upwards of 80+ GB depending on the model you choose. The terminal will display the download progress.
Once the download is complete, Ollama will load the model, and you’ll be presented with a prompt where you can interact with it. Test it with a simple query, like asking it to tell a joke, to ensure it’s functioning correctly. The initial response time might vary based on your system’s specifications, especially the CPU, RAM, and GPU. Models with higher parameter counts (e.g., 27 billion parameters) require substantial resources and might process requests slower on less powerful hardware.
Tips and Insights: Troubleshooting Common Ollama Update Issues
While the update process is generally smooth, you might encounter specific challenges. Understanding potential pitfalls and their solutions is key to maintaining a robust local AI setup.
“Requires Newer Version” Error Persists: Double-check that the `curl` command executed without errors and that you didn’t miss any steps. Sometimes, a full system restart after the Ollama update (even if the script says it restarted the service) can resolve lingering issues. You can also explicitly check the Ollama version: `ollama –version`.
GPU Not Detected/Used: If Ollama doesn’t report detecting your Nvidia GPU or seems to be running slowly, ensure your Nvidia drivers are up-to-date. For Linux, this often involves installing `nvidia-driver-xxx` packages. Confirm `nvidia-smi` works correctly, indicating driver installation. Re-running the Ollama install script might help reconfigure GPU detection.
Model Runs Slowly: Large models, especially those with 7B, 13B, or 27B+ parameters, demand significant RAM and VRAM. If your system is low on these resources, the model might swap to system RAM or even disk, leading to slow inference. Consider reducing the model size (e.g., trying a 7B parameter version if available) or upgrading your hardware. Ensure other applications aren’t consuming critical resources.
Network Issues During Download: Large model downloads can be interrupted by unstable network connections. If a download fails, `ollama run` will attempt to resume it, but consistent issues might require checking your network configuration or firewall.
Ollama in a Docker Container: This guide focuses on a direct (bare-metal or VM) installation. If you’re running Ollama within Docker, the update process involves pulling a newer Docker image. For example, `docker pull ollama/ollama:latest` followed by restarting your container. This is a common deployment method for isolating applications and is particularly useful in complex self-hosting setups.
Integrating Ollama with Other Tools
A local Ollama installation opens up a world of possibilities for integrating AI into your workflow. Tools like Open WebUI provide a user-friendly web interface for interacting with your Ollama models, making them accessible via a browser. For automation, platforms like n8n can connect Ollama to hundreds of other services, allowing you to build complex AI-powered workflows that respond to emails, generate content, or process data automatically.
Article Suggestion
Explore our guide on Integrating Open Web UI: A User-Friendly Interface for Ollama to enhance your interaction with local LLMs.
Learn how to Automating Workflows with n8n to integrate local LLMs into your productivity stack.
Conclusion
Keeping your Ollama server updated is a critical maintenance task that ensures you can leverage the full potential of local AI models. By following the steps outlined in this guide – performing a system refresh, rebooting, and executing the simple `curl` update command – you can seamlessly upgrade your Ollama installation. This process not only resolves compatibility issues with newer models like Qwen 3.5 but also equips your local environment with the latest performance enhancements and features.
The world of local LLMs is dynamic and exciting. Staying current with your tools ensures you’re always at the forefront, ready to experiment with the newest innovations in artificial intelligence right from your own server. I hope this guide empowers you to maintain an efficient and up-to-date Ollama setup. Don’t hesitate to share your experiences or ask questions!
Connect with the HAVOK community and other enthusiasts on our Discord server at: https://havok.link/discord-wp
Frequently Asked Questions

A driving force at the intersection of gaming, technology, and creator empowerment with over two decades of IT experience. HAVOK blends deep industry insight with hands-on expertise in digital storytelling and community building. Beyond content creation, he is a dedicated mentor helping emerging voices refine their brands and break into the tech industry with confidence and authenticity.